In today’s markets, there are many names and designations that have been given to fixing’s and anchors in relation to how they work during installation and what keeps them in place.
However, there are four main operating mechanisms under which 99.5% of all anchors and fixings work. These are:
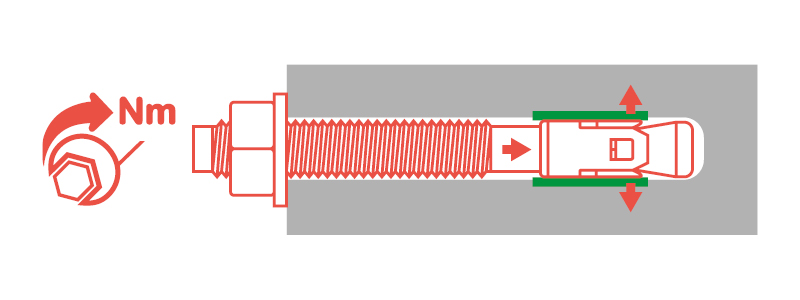
In this case, a metal sleeve, (steel anchors) through which either a threaded rod or bolt pass, which at the end of the thread has a cone. The bolt will have a nut and washer which when tightened, draws the cone into the sleeve, pressing against the side of the drill hole and in doing so produces friction that holds the fixing in place.
A typical example of the above is the Nexus Sleeve anchor or the Nexus Heavy Duty anchor.


There are a number of ways in which a fixing may form-lock and this tends to be either a metal or steel fixing which changes its shape (form) during installation and locks against the substrate into which it is being used. Unlike an expansion type of anchor, there is no ‘expansion’ pressure which may lead to additional problems.
A typical example would be the Nexus Hollow Wall Anchor which when being installed into a panel material such as plasterboard, collapses from a cylindrical shape into what often appears to be like an open umbrella, against the back of the plasterboard.
Although, in principle, not a mechanical functioning fixing, the resin bonded anchor when installed into a hollow wall with a sleeve, can also be classified as being form-locking, in that the sleeve has a liquid resin injected into the sleeve, filling the sleeve and the immediate area outside. A threaded rod is pushed into the soft resin and left to hardened. Once hard the resin will have filled the voids (formed) around the sleeve and retain the threaded rod embedded into the resin thus creating a formlocking anchorage in the hollow material.
An example of this would be the CA Chemical Injection Mortar in conjunction with the CA plastic sleeve insert.
Also known as a stress-free type of anchor. Which means that there is no expansion force when the anchor is installed and are used for high load capacity. Although, the description of the above is an example, is for form-locking, the same material can be used to provide an installation whereby a resin material bonds, in most cases a threaded rod (rebar where possible) to the substrate.
Resin fixing is mainly the result of a chemical reaction taking place when a resin and hardener (activator) are mixed together and set to harden with final strengths often in excess of the material into which they are installed. The speed of the setting process is dependant on the ambient temperatures.
Cement is also a bonding material but not used in the main for these types of anchors. The common materials are Epoxy, Epoxy Acrylate and Polyester.


A number of dispensing options are available:
In addition, there are also hand mixed materials which are usually supplied in tins or bags and mixed together by hand. They tend to be used for non-fixing applications were the anchor is less than 30mm Ø.
The fixing works by bonding a threaded rod with a suitable resin to the substrate. For hollow materials, a suitable Nexus sleeve must be used to contain the resin material, see above.
A hole is drilled into the substrate and cleaned to remove as much of the dust as possible. This is to prevent the resin from bonding to the residual drill dust rather than the hole. To do this correctly a brush and dust removal pump is required. Brushing and blowing the dust from the hole.
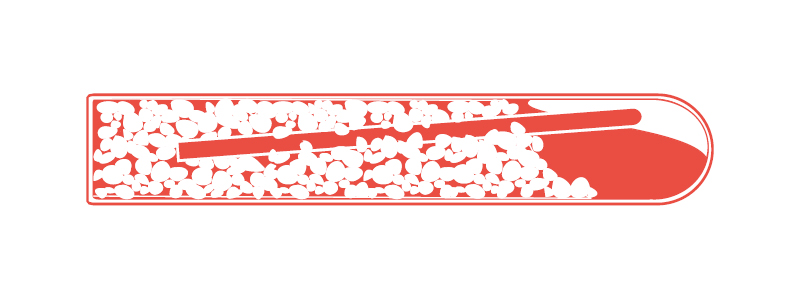
Once cleaned the resin (glass capsule, spin-in) is placed in the hole. The threaded rod is then driven into the capsule breaking it and mixing the resin and hardener together as it progresses down the hole.
The resin is then left to harden.
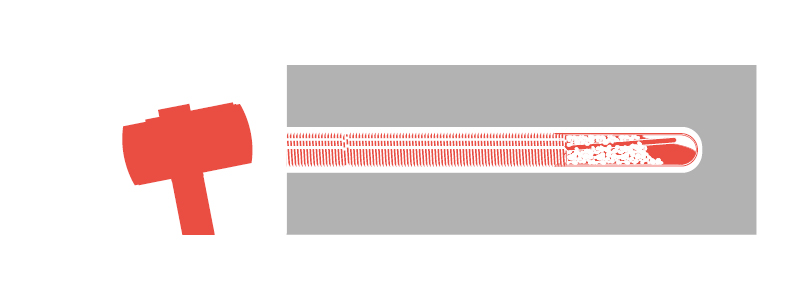
Although, a capsule, the Hammer-in as described, literally hammered in place. Once again the hole must be cleaned as previously described. The capsule is placed in the hole and the rod, usually re-bar, and is driven into the capsule mixing the two materials together by bonding to the drill hole. This is then left to harden.
The two above glass capsule types are specific to a corresponding drill hole Ø and depth.

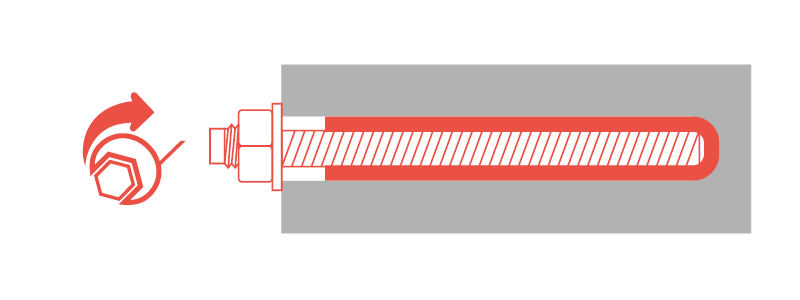
Finally, with a mixing nozzle (included with each cartridge) attached to the end of the cartridge, it is then placed into the appropriate application gun. This will depend upon the type of the cartridge used. In some cases, a conventional “sealant” application gun can be used.
The trigger is then pulled, which forces the hardener and resin out of the cartridge and into the nozzle.
Generally, the colour of the mixed resin is darker than either of the two components before being mixed together and indicates that the material is suitable to use. The nozzle is placed in the bottom of the drill hole. Resin is dispensed by pulling on the trigger and removing the nozzle from the hole as doing so. The hole is then completely full with the material. Either threaded rod or re-bar is then pushed into the soft resin and left to harden, bonding to the side of the drill hole.
Eccentrically an expansion anchor, the main difference being that the expansion is done by driving a cone (using supplied setting tool) down through the sleeve to set the anchor. This is unlike the conventional expansion anchors that rely upon a tightening torque to make the fixing function.